
No progress updates on the Siliconera RPG this week, but we promise to have something to show soon! In the meantime, here’s the next chapter in our continuing series of RPG Maker VX Ace tutorials. Purpose of Equipment To understand designing equipment, let’s first look at what Equipment is generally used for in RPGs. Equipment has two major purposes in RPGs: Stat Growth: The first is just to help the character become more powerful in the game. This is usually very easy to accomplish, a Basic Sword may give you +20 Attack, while a Great Sword gives you +25 Attack. This is the part of equipment that most players are most familiar with. You get to a new town and the first thing you do is check the Weapon and Armor shops for the newest biggest beat stick/armor you can buy. Character Customization: The second use is to customize characters. This requires a bit more thought on the part of the game designer and on the player as well as it is not linear growth. To explain this use of equipment, let’s look at two pieces of equipment from a similar tier of power. Leather Armor: +12 Defense Cloak: +8 Defense, +5 M. Attack, +5 M. Defense 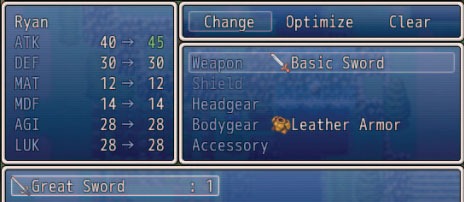 If you had a character who could equip both of these, which would be better to choose? It would depend on the situation and what the player wanted the character could do. If you wanted a bit of extra oomph to your spells, or were going into an area where you knew a lot of magic attacks would come your way, the Cloak would be better, if you just needed Defense, the Leather Armor is better. Player choice is almost always a good idea. Who Can Use What Equipment? Another thing that is a good to look at is different ways to distribute equipment among your characters. How do you determine who can use what? There are multiple ways to handle this, from having each character have their own unique equipment, to having every character be capable of using any equipment. You can also have categories of equipment, such as Character A and Character B can use Swords, while Character B and Character C can use Daggers. Mixing and matching is also possible, with different types of equipment being divided in different ways. Putting it All Together Now that we have looked at the possibilities of how to approach equipment, I’ll make some decisions in the how I want to use equipment in the Sample Game. I decide that yes, linear growth is a good idea, so there will be tiers of equipment. Weapons will have 3 tiers, Torso Armor and Shields will have 2 tiers, and the other equipment options will have 1 tier. The idea of Character Customization is good, so I decide to use armor as primarily for customization rather than pure stat growth. As far as deciding who uses what, I decide I want to make weapons unique to each character. As a primarily stat growth piece of equipment, each character can have their own weapons to use. With Armor, I am going with categories. Each character will have access to two different categories of armor, and there will be overlap between characters. Different categories excel at different things, so it lets you customize your characters a bit. Shields are unique to Madilyn, because I decided Winter would dual wield, and Ryan is using two handed weapons. The final equipment slot, Accessories I decide will be special, and not give stat bonuses at, instead giving other advantages. They will all be equippable by anyone. Back to Planning: And now we are back to the most important part of making an RPG: Planning. Weapons are pretty straight forward, Ryan uses swords, Madilyn uses spears, Winter uses daggers. I like dual wielding daggers, so Winter will be use two weapons. The main purpose of the weapons in this game are linear stat growth, so I start with a relatively small number of +Attack and add more as they go up tiers. Thinking about it, I also decide to make the top weapon in each group an elemental weapon, with different elements for each character. Armor is a bit more complex. With it done in categories and focusing on choice, I need to decide what categories I want and what bonuses they will give. In the end I decide on 4 types of armor plus shields, and what they affect. Clothes: Equippable by Winter, clothes will provide low Defense, while giving a boost to Accuracy, Agility, and Evade rate. Robes: Equippable by Winter and Madilyn, robes will provide low Defense, while boosting Magic Attack and Magic Defense. Light Armor: Equippable by Madilyn and Ryan, light armor will provide only medium Defense. Heavy Armor: Equippable by Ryan, Heavy Armor will provide high defense, but a penalty to Accuracy, Agility and Evade Rate. Shields: Equippable by Madilyn, shields provide a bonus to Defense and Evade Rate, while lowering Accuracy.
  As you can see, every character has a choice when it comes to their armor. Ryan can go for high defense at the expense of his accuracy, evade, and agility by equipping Heavy Armor. Madilyn has to choose between bonuses to her magic attack and defense, or a higher defense. Winter has to choose between magic attack and defense, or agility, evade, and accuracy. Madilyn also has another choice with Shields. Shields increase her defense, but lower her accuracy. All of these are choices. Character growth choices are important in RPGs because it helps players feel like they are THEIR characters. What we are doing in this example game is admittedly very minor, but it prevents all players playing the game from having identical stats. Accessories, I have decided will not be necessary equipment for stat growth, instead giving boosts that help out in different ways. One each will regen your resources (HP, MP, TP) and the other will get rid of random encounters. Accessories will be equippable by anyone.
 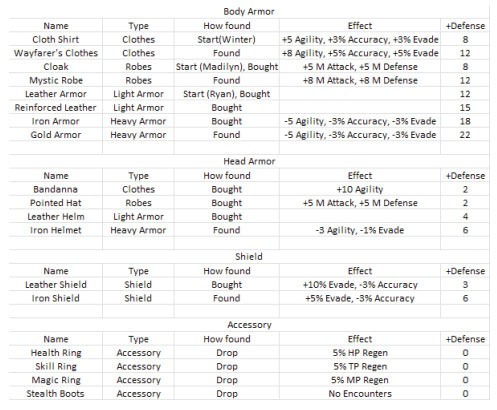 Above is the full spreadsheet planning list for nonweapon equipment (for weapons, check the planning sheets from the last tutorial). As you can see, the same themes are carried across to head armor as well. I’ve also done some work on how they will be acquired, I will be covering that later. Prep Work in the Database: First let’s do a bit of prep work before making our equipment. Click over to the terms tab. Just like with skills, we need to put in weapon and armor types. Just fill in the 3 types of weapons and the 6 types of armor. The next piece of prep work needed is to apply which characters can equip which type of equipment. This involves one of the most important parts of the database: Features.
 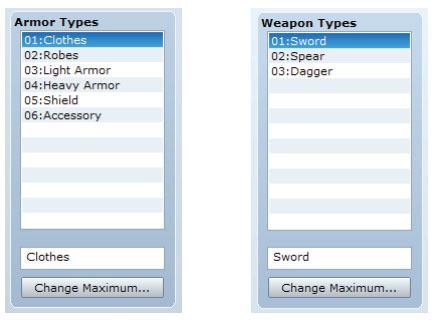 Intro to Features: Features are one of the new components in RPG Maker VX Ace, and is one of the most important. Features are used to affect the character in the following ways: • What they can equip • What skill types they can use • Type of damage done on attack • States added on attack • Adjusting primary stats • Setting secondary stats • And more… One of the biggest advantages of Features is that they aren’t restricted to one tab in the database. Features are available to be added to Actors, Classes, Weapons, Armors, States, and Enemies. This allows you to create customization systems very easily, as you can have different components add together in different ways to create your character. Using Features to Add Equipment Types: The first thing to do when adding any feature is decide what portion of the character it needs to go in. With the example game, I have two options for equipment types: Actor and Class. Since in the example game, the characters all have unique classes and no one ever change class, the Actor and Class tab Features are effectively interchangeable. With other setups, such as a game with a class system, you may want to split things up with persistent parts of the character on the Actor tab, and class based things on the Class tab. Just for organizational purposes, I am going to be using the Actor tab Features box for all the Equip types and Skill types, and the Class tab Feature box for all other persistent features of the character. I’ll add a single Equipment type feature to Ryan’s Actor, and then you can add the rest on you own by following the same method.
 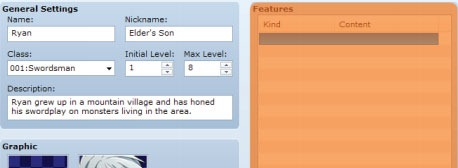 Above, the Features section is highlighted on a screenshot of Ryan’s Actor in the database. Much like you did with effects on skills, double click an empty line. This will pop up the Features box. Navigate over to the Equip tab (below) and check Equip Weapon and select Swords. Then hit OK. Simple as that, you’ve added a feature!
 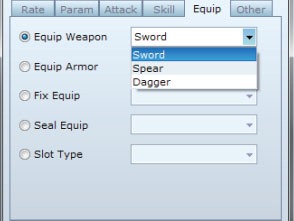 Using Features to Add Skill Types: Now that we’ve added Equipment types, we need to add Skill Types too, since we didn’t do it in the last tutorial (I was saving it for this Feature section!) I’m throwing this in the Actor tab Feature section as well, so double click on an empty line there to pop up the Features box again. Switch to the Skill tab, check Add Skill Type and select the appropriate skill type (I’m working on Ryan right now, so I’ll select Sword skill here). Repeat across all actors for every skill type they use.
 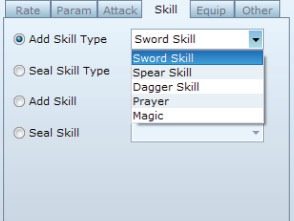 One Last Feature to Add: In the example game, I’m making Winter dual wield. Well, that is ALSO a feature, so let’s head right on over to her Class and double click on the Feature section to pull up the Feature Box. Head over to the Equip tab (see below) and check Slot Type. The only option in this one is Dual Wield, so just hit OK.
  That does it for features for now. We will be exploring Features more when creating equipment. Tips and Tricks: Unfortunately, I don’t have the space to go over every possible option here, but there are already two great resources for you to use. First you can hover over any option and get a nice popup hint to explain it. Second, is the huge Help file that goes in depth on almost every option in the editor. Creating Weapons and Armor: I’ll be making a basic piece of armor first that will show most of methods you will use to create all equipment, then will go over a few things to keep in mind with Weapons. The General Settings section in the Weapons and Armor tab should look pretty familiar after creating skills in the third Tutorial. The only new options are Equip Type in Armor and Price which is on both Weapons and Armor.
 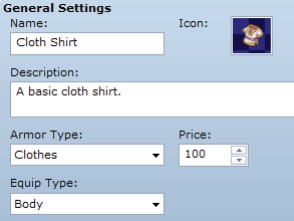 Price is the default price it will sell for in shops in game, while Equip Type covers which Equip slot it goes into. You should be able to quickly fill this section out and move on to the Parameter Changes section.
 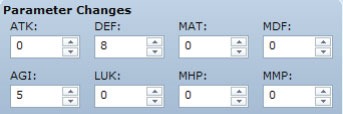 In the Parameter Changes section, you put in the flat increases that the piece of equipment will give to a character equipping it. For this piece of Armor, we add increases to Agility and Defense. The last thing needed for the Cloth shirt is to head over to the Features section and add in some Eva and Accuracy increases. Just follow the instructions on adjusting secondary stats on page 7.
 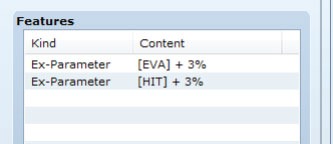 Useful Weapon Features: One Feature to keep in mind when creating weapons is the Atk Element Feature. This is useful for the Top Tier weapons in the example game, as we want them to do elemental damage rather than physical. Another feature that is useful for weapons is the Seal Equip Feature. The main use for it is to create two handed weapons. By having them Seal the shield slot, you can have a weapon that can’t be used at the same time as a shield. In the example game, this isn’t really necessary, since Ryan can’t use shields anyway, but I applied it anyway just to illustrate the point. The Features of the Lightning Blade is shown below.
 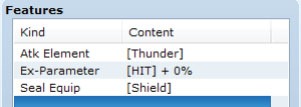 Creating Items: Creating items is incredibly similar to creating skills, in fact, the only things added are Price, which we went over with Armor, Consume. The consume tag is used for comsumable items such as herbs/potions. If it is set to yes, the item will be used up once it is used once. Since we don’t need to go over item creation, let’s go over some design theory on items instead. In general, you don’t want items to overshadow skills. This doesn’t mean they can’t be more powerful than skills, you can make an item powerful that is rare, but items you can easily acquire need to be less powerful than comparable skills. Another thing to keep in mind is gameplay need. For instance, in the example game, we have no skills that can resurrect a fallen hero. So I need to make a buyable item to fill in this gap that can handle it for me. Treasure Chests! So we have a bunch of items and equipment now, but how does your player acquire any of it in game? The first way we are going to explore is Treasure Chests. Treasure chests are an easy event to handle, as we can create them with the Quick Event Creation options. Switch over to the event layer on our Village map and right click to the left of the waterfall south of the steps.
 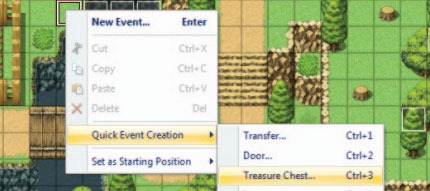 Then you can select Quick Event Creation => Treasure Chest. This will pop up the Treasure Chest Event options.
 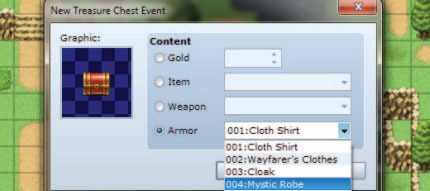 I select Armor, and select the item I want, in this case, the Mystic Robe. Now that I’ve done that, I look at the Treasure Chest Graphic. The bright red chest doesn’t match our village very well, so I double click on that to pop up the graphic select window. There I select a nice wooden treasure chest.
 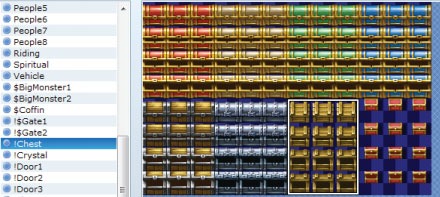 Shops! Now that we’ve put our toes in the shallow end of eventing with cosmetic events and quick event creation, its finally time to really look at a custom scripted event. Let’s make a shop so that players can buy some stuff. In the example game, I have a spot set up for a travelling merchant who can’t leave town until a nearby landslide is cleared up. While in the event layer, let’s right click between the crate of fish and crate of tomatoes and hit New Event. You should already know how to set the Graphic from Tutorial II. Make sure you set the Priority and Trigger correctly.
 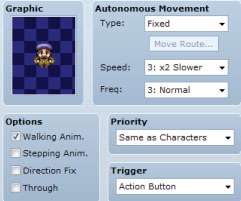 Priority needs to be set to Same as Characters so that you can’t walk over him, and the Trigger needs to be set to Action button so that the event activates when the player hits the Action button while facing it. Now look over at the large section on the right side of the event. Double click on the @> end line to insert a new event command into the event. Note: You can right click insert as well. You can also right click to edit an event command, or right click to delete an existing event command. The next thing you need to do is DON’T BE INTIMIDATED. Yes there are a lot of options, but we can learn them a little bit at a time. Switch to the third tab and find Shop Processing in the Scene Control Group.
 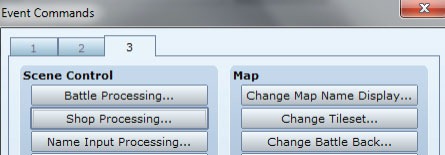 In Shop Processing, you can just double click to bring up the goods window and add any item or piece of equipment you want to the list of things they will sell.
 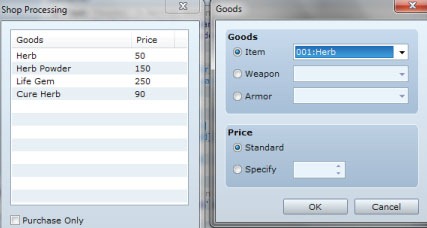 You can let it set it to use the Standard price, or a custom price if you want. After you are done, just click OK and you have a working shop. Unfortunately, its a bit boring. You click the action button on him in game and the shop menu pops up and when you are done shopping, it goes away. Now, let’s add some messages before and after the shop window so that our Merchant can actually talk to us. First, double click on the Shop Procession event command in your window, this will insert a new event command above it in the event. (Events always run from the top to the bottom unless event commands change the processing order) In the message group on tab 1 of the event commands, select show text.
 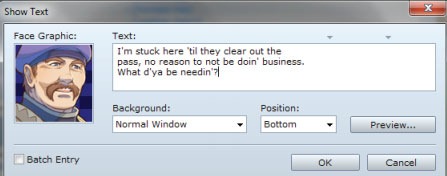 Write in some appropriately worded text for our merchant to say and select a face graphic to use. Be careful about going over the limit per line. If you are worried, click the preview button to see what it will look like in game. Repeat this step to give him some text after the shop menu goes away by double clicking on the @> at the end of the event. Now you have a nice working shop! Your even should now resemble the screenshot below:
  Tutorial Wrap-up: In this tutorial, we have covered a LOT of important things. First we explored how the point of equipment in most RPGs and things to keep in mind when designing it. After that we went over how to design them in the editor. We also got introduced to the very important Features system that RPG Maker VX Ace brings to bear. Features allow us a ton of customization. After that, we went over how to create Treasure chests using the Quick Event Creation system. Finally, we got further into the basics of eventing by writing a working event from scratch, a Shop for our characters to buy equipment from.
The Siliconera RPG Maker VX Ace Project – Equipment, Items, and Features Tutorial
Recommended Videos