
Purpose of Encounters: Encounters in role-playing games serve several purposes, and being aware of these purposes is important to designing your own games. There are two purposes that are more prominent than the others. The first is challenge. Without challenge, a video game would just be a slightly interactive movie. While there are some works in that direction, for the most part, games need challenge of some sort. In RPGs the two major form of challenges are generally encounters and puzzles, and in most cases the majority of challenges fit into the former. The second purpose is progression. There are two ways encounters promote progression. The first of which, and what we will focus on in this tutorial is character growth. In a standard RPG, as the characters wins more and more encounters, they acquire more gold and experience points. The experience the characters receive allows them to go up in level, while the gold is used to buy better equipment. 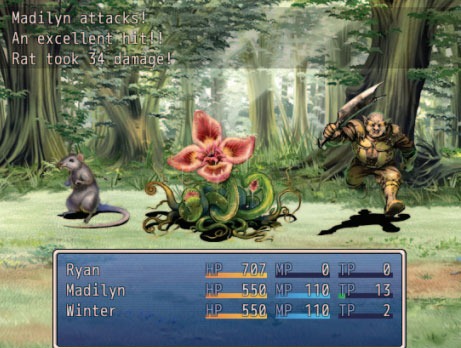 The other way it promotes progression is that encounters can progress the story. Boss fights are one example of this. Another is encounters that drop items that you need to complete the current portion of your quest.
 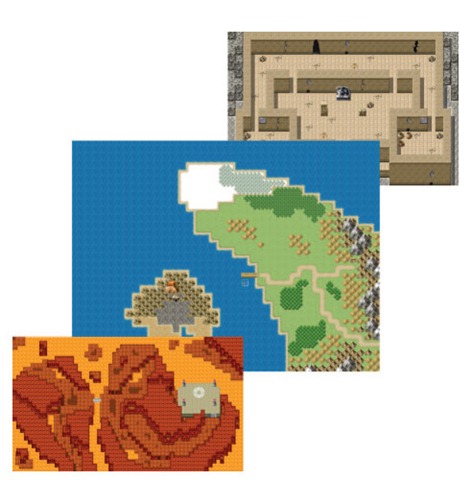 Now that we have looked at why we have encounters, we can begin to plan out how we want to lay out those encounters. The first thing to do is look at all the maps you have created that are going to be “danger” maps where encounters can occur. I have made three of those maps for the sample game: The World Map, The Ruins, and The Fire Cave. So now we need to decide what enemies should be encountered in each map. But wait, what if we want one map to have different encounters in different areas? That is where Region IDs come in, which will be explained after we determine the individual encounter areas (distinct areas with their own encounters) we will use. I decide to divide my world map up by geographical area, and leave both the other maps as just one encounter area each. So I have the following encounter areas: World Map: Grass, World Map: Hills, World Map: Forest, World Map: Snow, World Map: Volcanic Island, The Ruins, and The Fire Cave. Using the Region ID Layer: With the encounter areas decided, we now need to divide up our World Map into areas. We do that by using the Region ID layer. In the Map Editor switch to the World Map. Once there, switch to the Region ID layer. The button for this is between the Event Layer button and your pen tools.
 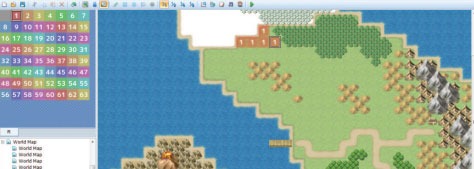 Once there, your tile palette will be replaced with incredibly gaudy colors with numbers on them from 1 to 63. Don’t worry, they don’t show up in game. Select the number you will be using for grass (in my case, it was 1), and paint across all your grass tiles. It operates identically to the pen tool.
 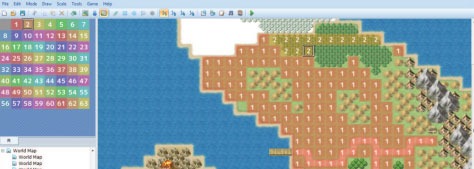 Though you can’t select the fill tool, you can use the drag left click to select clusters of the same Region ID. This layer operates independently of the others, so you don’t have to worry about it copying the graphics when copying.
 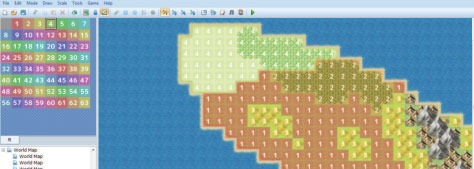 After you finish with the grass, paint the other terrain types in your map with different numbers based on the encounter areas you set up previously. I used 2 for Forests, 3 for Hills, and 4 for Snow (Snowy forests included).
 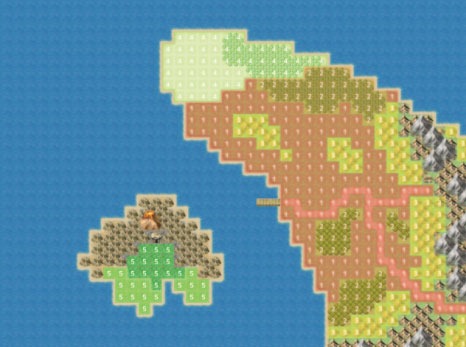 After I finish up the mainland, I’m going to take a quick jaunt down to the volcanic island and I can paint that with 5.Now we’ve set up all the Region IDs so that we can use them to separate encounter areas. Region IDs, much like Noteboxes, can also have additional uses added through scripts. Now that we’ve divided it out, I’m going to take one more step that has more to do with personal preference. A lot of people don’t like world maps very much, and one of the reasons is that its just filler for encounters. To help prevent this problem, I decided to make roadways not have any encounters.
 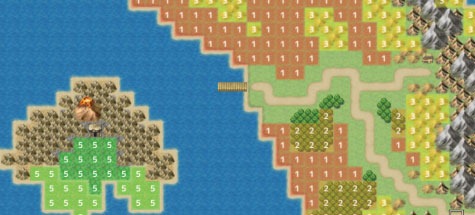 To do this, I just selected the null Region ID (upper left of the palette) and erase the Region ID off of the road. To help with people who don’t quite follow the road exactly, I spread the null Region ID out one tile away from it. I’ll set an NPC somewhere to tell the players that roads are safe for travel. The Experience Curve:
 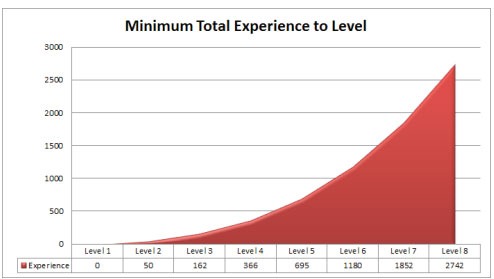 Experience progression is a hard thing to balance and it has a lot of moving parts. To begin with, I’m going to discuss those moving parts, then I will discuss how they interact. The first part is the experience curve itself. The experience curve is the total experience needed to get to each level. In the example game, I’m leaving this at the default. Below is the default experience curve in RPG Maker VX Ace. Milestones and Expected Level: All games have milestones in their progression of plot. These are points in the game where you tend to open up more encounter areas, or when they fight a boss fight. Every milestone should have an expected level. This is the level that the encounters are designed around for difficulty. Being higher level will make the area easier, and being lower level will make it harder. Your job as a game designer is to make sure that most players end up as close to expected level for each portion of the game unless they do some really heavy grinding or skip a lot of stuff. The example game has the following milestones with expected levels listed: • Start: Level 1 • Obtain Boat: Level 4 • Open Fire Cave: Level 5 • Face Final Boss: Level 6 Average Number of Encounters per Area: This one is much harder to nail down and you will have to playtest to figure it out. What you want to discover is the average number of encounters you will interact with in a certain area, if you go directly for what you need to reach your next milestone. Since most players aren’t going to go directly at it, you should probably add about 20% to that number just to get a better idea of what most players will do. This is the one variable in character progression that is the hardest to adjust. The other variables you can change directly, you can change the experience curve directly, and you can change your expected level just by balancing around a different level. But it isn’t impossible to change this variable. The most direct way to change it is to add distance between two points, making it just take longer to travel. You can also just make encounters more common, though at a certain point this angers players. No one wants to fight every three steps, and if you design a game around this expect a lot of complaints. Another option, is to require the player to get a certain number of drops for a quest before progressing. In the example game, there will be a boat sitting at the end of the dock on the world map so that players can travel to the volcanic island. But what is keeping characters from walking straight too it and going directly to a higher expected level encounter area?
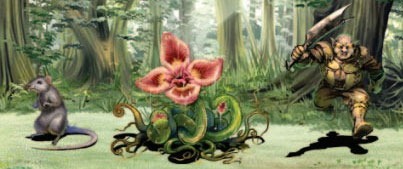
 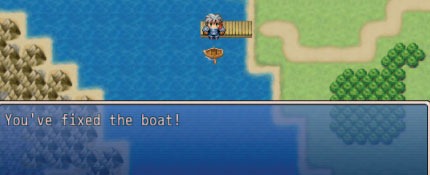 In this case, I’m going to add in a short quest of collecting some wood from plant type enemies in order to fix the boat. This requires the player to stick around the area until he has gone through a certain amount of encounters to get those drops. (This will be added in a later tutorial, but it is important to know it will be done in this tutorial.) Planning Encounters in RMVX Ace: We’ll get to putting all those variables together in a minute, but first, we need to learn how to set up encounters so that we can measure average encounters through playtesting. Encounters are built in two tabs in the Database: Enemies Tab: The Enemies Tab is where you build individual enemies. Trooops Tab: The Troops Tab is where you put groups of individual enemies into specific encounters for the player to encounter. This is an intuitive approach, and will be the same approach we will take while designing the encounters for each encounter area. The first thing I suggest to do is get familiar with all your available monster graphics. For the example game, I am going to be using RTP monsters only. Go to the Enemies tab in the database double click on a monster graphic, and scroll down through the graphics available to you. Planning Enemies: The first thing we need to do is create enemies for each encounter area. The way I find easiest to do this is to create another spreadsheet to match enemies to area. I start using a combination of the area and my available graphics to lay out some monster ideas. Make sure that it makes sense for the area. For example, I selected the Plant monster Battler to create my Man-Eating Plant, which logically resides in the Forest area.
 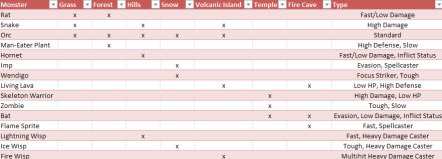 Try to make sure you have several different monsters for each area. Another thing I add is a Type Column. In this column I pop down a short description of its gameplay mechanics. Make sure to makes some variety in how they play. Variety is one of the most important things in Encounter Design. Putting the Enemies into Troops:
 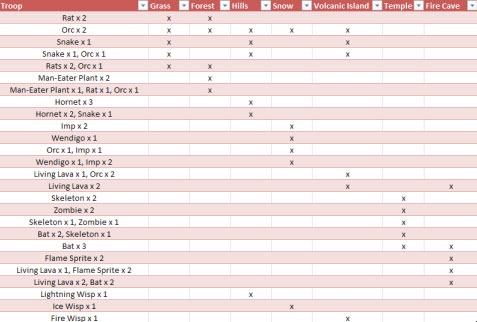 Now, you can repeat the same process by combining the individual enemies you created into planned troops. Make sure you have a variety of different possible encounters in each area. I aimed for 5 encounter types in each area, plus 3 special encounters at the bottom that will be used for a item drop collection quests.
  The combination of enemies will create very different encounters. Above is one of my encounters. I labeled how I would approach it as a player, which is influenced by the amount of threat the enemies pose to me.
  Above, even though the Wendigo is a bigger threat, I would prioritize the two imps as they are quicker to kill. Variety creates multiple required approaches, which requires players to think through their actions. Laying out the Framework: Enemies Tab: The first action we are going to take is to set up the framework in the Database. Go to the Enemy Tab of the database. For this pass through, we will only be concerned with the section shown below:
 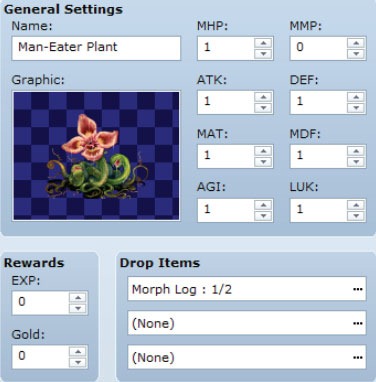 Instead of trying to put everything in at once and eyeball the EXP and Gold, we are going to set up encounters so that we can easily test areas to get all the variables we need so that we reach our milestones at the levels we want. First go through and name all your Enemies based on what you planned out in your spreadsheets. Second, set all their stats to 1, this will let us fight through them quickly during the encounter rate testing. Third, set the Battler Graphics. Use the Hue slider to change the Battler color!
  Fourth, set any quest drops in to judge how long it takes to acquire them. I’m setting the Man-Eater Plant to drop a new item: Morph Logs, which will be used to fix the boat. Laying out the Framework: Troops Tab: Next, we can set things up in the Troops Tab. Flip your spreadsheet over to your encounter groups and start filling them in. All you have to do is select the monster you want on the right, and click Add to put them in the encounter…
  … and repeat as needed until the encounter is filled.
 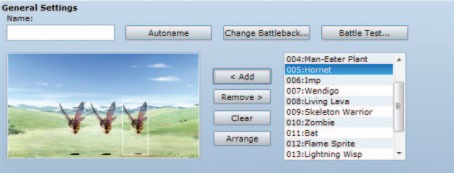 From there, you can drag the the monsters around on to set them how they will appear in the encounter. I personally like to break up the horizontal top and bottom lines created when you added them. Move them around to get a more “random” look.
 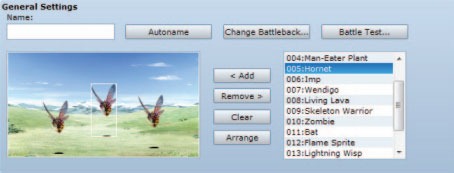 You can name your Troops however you want, but I prefer just to click the Autoname button to finish our current work in the Troops Tab.
 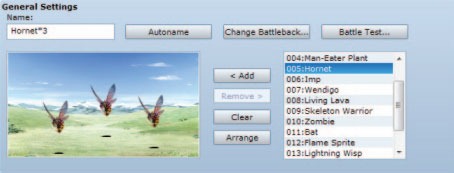 Laying out the Framework: Map Properties: Save your work in the Database and close it out by hitting OK (You should be saving regularly using the Apply button, You don’t want to lose all that work you are putting in). Right click on one of your World Map and select Map Properties. We are interested in the Encounters section shown on the right below.
 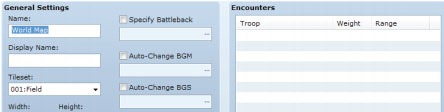 Double click on the list to open up a new Encounter for this map.
 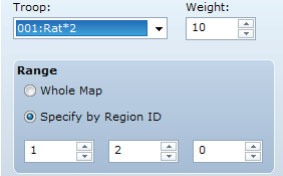 On this, there are only three things to pick from: 1. Troop. Here just select the troop you want to apply to the map. 2. Weight. This determines how common the encounter is in its areas. The higher the more common they will be. I left it on 10 for all the encounters except the Wisp encounters, which I wanted a bit rarer and set to 5. 3. Range. This determines where on the map this encounter will show up. On the two dungeon maps, we can just select Whole Map for all of them, but on the World Map we will need to select by Region ID. You can select up to 3 Region IDs per Encounter. If you need more Region IDs (like the Orcs*2 Encounter) just add it again and add the other Region IDs there.
  The only other thing to adjust here is Steps Average, which determines the average number of steps between encounters on the map. It is below the encounter list. Connecting Maps with Transfer Events:
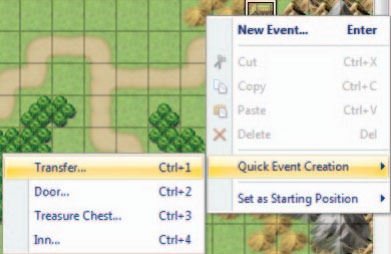
To do our testing, we need to connect together all our maps with Transfer Events, so that it is easy to test our encounter areas. To do this go back to your World Map and switch to the Event Layer. In this section, I will build the transfer event between the World Map and the Village. You can build the rest of the transfers following the same method.Right click on your transfer location and select Quick Event Creation => Transfer. 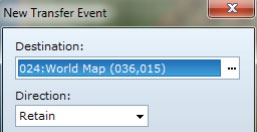 On the New Transfer Event Popup, we only have two options. The direction option will change what direction our character is facing after being transferred. For the moment, I will leave this on retain.
 ![]() To change the destination, just click on the “…” and select the map and coordinates you want the player transferred to. Repeat until all of your exit and entrance points have transfer events. Placing Player/Boat Starting Positions:
To change the destination, just click on the “…” and select the map and coordinates you want the player transferred to. Repeat until all of your exit and entrance points have transfer events. Placing Player/Boat Starting Positions: 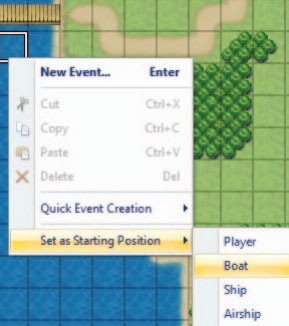 Now, you may wonder how we are going to get from the mainland to the island while playtesting. We are going to place the starting position for the boat. To do this, while on the event layer, right click the location below and select Set as Starting Position => Boat. Repeat this somewhere in the Village but instead select Set as Starting Position => Player. Changing Tile Passability: Now we can walk across all our maps at one time… But wait! We can’t walk on that dock! I actually made this mistake when I built the original map. I had assumed that the passability of that tile was set to allow us to walk on it, but it wasn’t. Luckily this gives me a great time to talk about changing passability.
 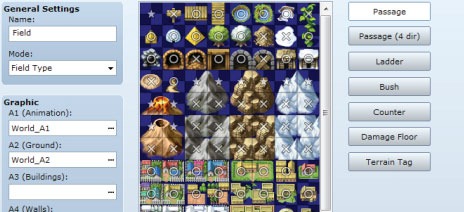 Open up the Field Tileset in the Tileset Tab and switch to Tab B. You will see that the two “Dock” tiles are set to X passability. Just click on them to cycle the passability until it changes to O. Testing to a Milestone: Now we have access to everything we need to test the average number of encounters to each milestone. To get to the first milestone, the player will need to collect 3 Morph Logs from Man-Eater Plants. Since we will tell them when they are looking at the boat they will need this, we can move directly walking around the forests to find encounters with them. I also go on the assumption that the player will do one of the two available sidequests available to them up to this point. For this he will need to collect three Lightning Gems from Lightning Wisps. (I set them to drop a Lightning Gem on every encounter).
 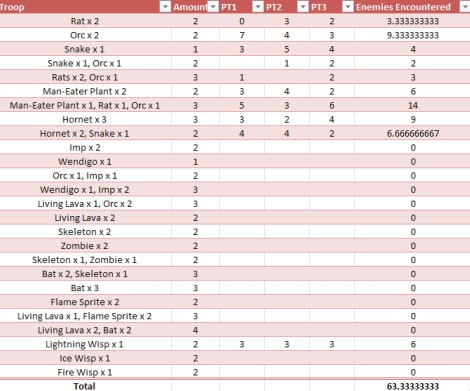 Play through the section several times attempting to get these specific items. Record the number of times you run into each encounter group, and then calculate the total number of enemies you fought. I counted Lightning Wisps as two enemies, as I wanted them to give twice as much experience as other enemies. Shown above is a table I created while testing to the first milestone 3 times. I then calculated the number of enemies I encountered averaged between those three playthroughs. This may seem tedious, and it is. All great games require tons of playtesting. Putting it All Together: Now that we know this, we can determine how much experience each enemy should give on average if all other variables remain the same. The average number we reached was ~64 enemies. I would round this up to 70 since we were going directly at the goals and not everyone would do that. Since we need to reach level 4 from level 1, the player should gain at least 366 experience across 70 enemies. Since 366/70 = 5.23, we can round up to around 6 XP per enemy on the mainland. We could also do other things if this amount doesn’t work well for us. We could require less Morph Logs or Elemental Gems to finish the quests, we could change the drop rates of the items, or we could even change the weights of the enemies that drop them. One thing I did notice was that 30 steps is way too high with such a small world map with safe paths. I changed it to 15 for my second and third tests and it worked much better. Tutorial Wrapup: In this tutorial, we have learned how to plan out the encounters we will have in our game. We discussed enemy and encounter variety, and how it forces players to think. We then moved on to implementing the framework for the encounters in the editor itself and how to use the Hue changing function to make Battler Graphics different colors. We also made transfer events, set starting positions of vehicles and players, and changed passability of tiles. And finally, we worked out how to test using our framework to determine how much XP our enemies should give.