
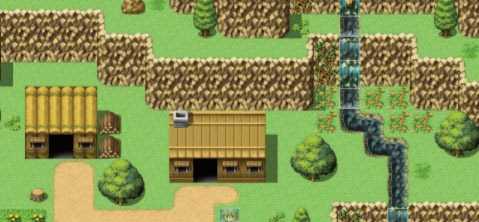
Last week’s poll is done, and the winning choice for our Siliconera RPG was, by far, the Mountain Town locale. From here on out, we’ll be proceeding with this as the tileset we use for our game.
Before we begin work in earnest, though, we need Siliconera’s readers to vote on another important aspect of the RPG–the hero’s motivations. Now, this isn’t going to be a project of a grand scale or anything. We’re trying to keep it small and funny. So, with that, the choices for our hero’s goal or motivation is:
Now, some of those sound silly and simplistic, but we’ll be penning the game’s story from scratch around the winning choice, which will give us some interesting opportunities to keep things surprising. And while we wait for everyone to cast their votes, here’s this week’s RPG Maker VX Ace tutorial, using the Mountain Town tileset.
What is a Map in RPG Maker VX Ace?
A map in RPG Maker VX Ace is a single continuous collection of tiles used to visually create a location in your game’s world.
As we discussed in the last tutorial, a map is constructed from 32 x 32 pixel tiles. There is an element of layering as well, allowing you to put different types of tiles on top of each other, giving you a composite tile. Combined, these tiles will create a single location for your character’s to explore.
The First Step in Creating your Own Game
With this tutorial, we will take the first step into actually creating our short example game. This game will consist of the following:
• 1 Town
• 1 Small World Map
• 1 Dungeon with two floors
• 3 Playable Heroes with unique skills
• A variety of Random Encounters
• 1 Big Bad Boss
In the tutorials, I will show you the techniques I am using to create each component, but you can easily modify each step as you see fit. In fact, some steps will be left for you to finish using the techniques I am teaching. Our first step will be to create the map of the main character’s home village. But first, we will look at some fundamentals.
The Map Editor Interface
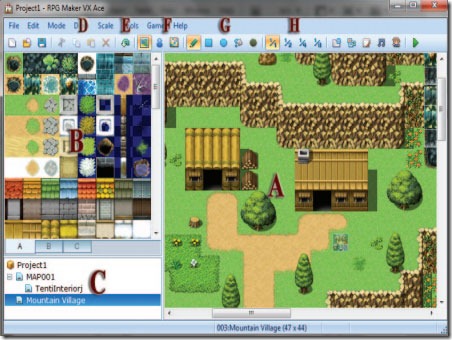
The image above shows the Map Editor with the important parts labelled. The labelled portions are detailed below.
A, Map Canvas: This is where you create your map. Just left click on it to draw using your currently selected tile.
B, Tile Palette: This is where you select the tile you wish to use. There are multiple tabs, listed from A to as high as E depending on how the way the tileset is set up in the database. The standard Exterior tileset shown here has tabs
A through C.
C, Map List: This is where all the maps in your game are listed for you to select. You also create new maps by right clicking in this area, as well as adjust the properties of your existing ones.
D, Copy/Paste Tools: These allow you to cut, copy, paste or delete the map you have selected in the Map List.
E, Undo Button: This allows you to undo the last change you made to your map.
F, Layer Selection: This is where you select which layer you are working on. VX Ace has three selectable layers, Map, Event, and RegionID. This tutorial will focus on the Map layer, and its internal layering.
G, Tools: This is the drawing tools you have available. They are, Pen, Box, Ellipse, Fill, and Shadow.
H, Zoom Selection: This allows you to change your zoom level.
Autotiles
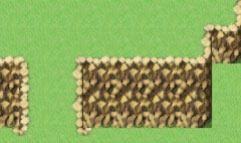
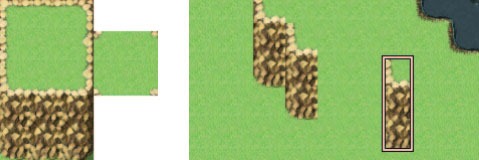
Various autotiles.
Autotiles are a special type of tile that make creating maps quick and easy. An autotile is a single tile selectable in the Tile Palette that when used on the Map Canvas creates shaped tile areas. There are a variety of autotile types, which
are all part of the A tab in the Tile Palette. There are two layers in the A tab, the bottom layer, and the embellishment layer, which can be seen with the fence above.
Tile B-E
The B through E tab tiles are all used on a third layer above the two A tab layers. They are used mostly for adding details to existing maps. The blue checkered area in the Palette represents the transparent portions of the tiles, which will allow the A tab tile below it to show through. The image above shows a variety of B-E tiles added to the previous autotile example map.
Right Click Copying
Right Click Copied => Left Click Paste
If you need to quickly copy a composite tile you already have built in another place on your map, you can just right click on the tile to change your selected tile in the palette to the composite tile you just clicked. You can then draw it by left clicking on your map in other areas.
You can also use this to copy larger sections by right click dragging across the entire area you want to copy as shown in the figure above. Side Note: You can also select multiple tiles from the tile palette by dragging across them.
Remember, this will copy the entire composite tile, meaning both A tab tile layers, and any B-E tile table layer you have. It will also redraw any autotiles to match the new shape you have created.
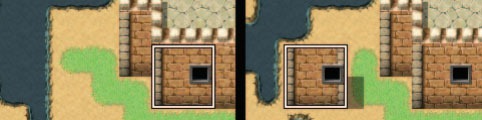
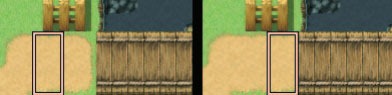
Shift Click Copying

Shift Click Copied Wall => Shift Click Paste
This of course leads to the question: What if you need to keep the autotiles drawn the way your copied selection was?
This is luckily very easy. First hold down the shift key. While holding it down right click (or right drag click) the tiles you want, then while STILL holding shift, left click on the area you want to paste.
You can see in the image above that the autotile configuration stayed the same when it was shift click pasted. You can use this in many ways to make your maps look much more polished. A few of these ways will be covered when we make our mountain village map later in this tutorial.
Perspective: Understanding the Standard 2D “Top Down” RPG Viewpoint
Let’s take a moment away from the program itself to discuss a subject that is important to good map design: Perspective.
 Standard Perspective
Perspective is how a scene can be drawn onto a 2D medium, such a computer screen, to represent 3D scenes, such as your game world (unless you happen to be making an RPG based on Edwin Abbot Abbot’s Flatland). Perspective is shown above with a concrete block box with a metal top sitting on a grassy field. Two things should be immediately noticeable. The first is that there is a vanishing point. What this means is that parallel lines of the object such as the left and right side of the grass get closer together the further from the observer they get.
The second is foreshortening, which is where the top of the block, which is closer to the observer appears larger than the bottom of the block, which is further from the observer. Foreshortening makes the block jump out at us, and indicates that it is not a part of the ground.
Unfortunately this type of perspective can’t be used in most 2D RPGs as when the map moves left and right, the vanishing points would have to move to accommodate the new viewpoint, which is not possible. Another problem is that when the map moves up or down, objects would have to change size as the observer becomes closer to it, which is another thing that we can’t manage with a pure 2D environment.
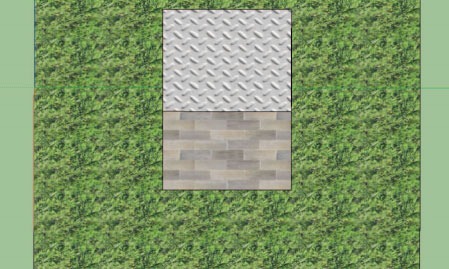 Parallel Projection Perspective
Above, we have the same object shown with parallel projection. In parallel projection, two parallel lines on the object are drawn parallel on the image. It also removes foreshortening. As you can see, this flattens out the image tremendously
and makes it look much less 3D, but it does remove the problems we had previously with moving the viewpoint of the observer.
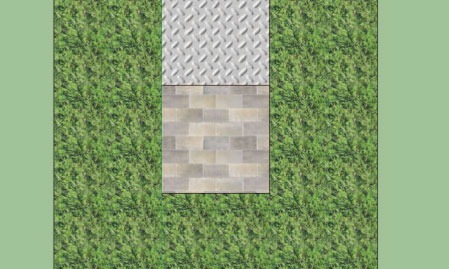
Now we run into another problem. With this style of projection, everything gets slightly squashed because of the angle we are viewing it at. This makes it somewhat difficult to show details, on walls especially. In an RPG we might need those details, so with traditional “top down” RPG perspective, walls and floors
are stretched to allow full detail. See this below:
Why Understanding the Perspective Matters
So now, we understand the perspective used in RPG Maker VX Ace and why it is used, but why does it matter? Because this perspective is used in the majority of
2D “top down” rpgs, almost all visual cues to height are removed. Without foreshortening or vanishing points, all the normal cues to the grade (angle) of the ground are removed.
This means that every change in height in your game needs to be seperated by a very steep change in height signified by an obvious height changer (such as a cliff wall.) The best way to look at your maps is to view them as cubes.
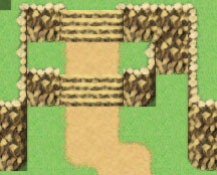
Each vertical wall raises that level by one unit. For an example, first look at the image to the right. This is a simple section of a town map with some height changes.
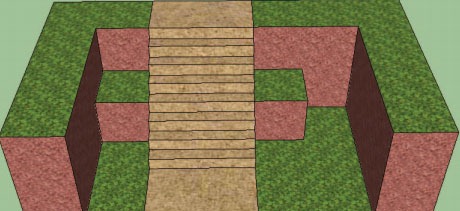
The image above shows a representation of the same area with 3D perspective when height is viewed as cubes. You will also notice that the stairs have to be adjusted due to the “stretching” of the cliff walls in the top down perspective making them appear wider than they are.
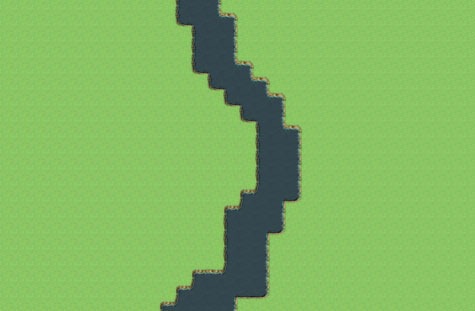
In this figure to the right, you can see mistakes that are made by not thinking of vertical height in cubes.
On the right, there is a vertical wall height change, and on the left we see a lack of a height changer tile.
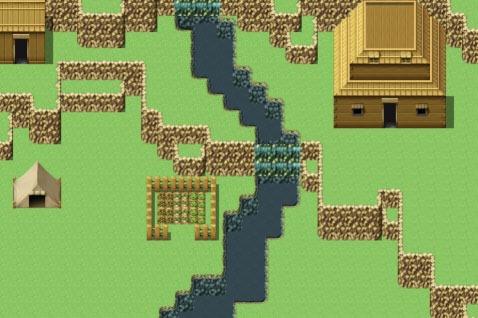
The Setting of our First Map
For our first map, we are going to make the area around the main character’s home. Our main character is the son of the village elder of a small mountain community. Rather than mapping an entire town, we will focus on the area surrounding the village elder’s house.
This will let us focus more on the exact methods I am using, which can be easily transferred to a larger map. The first thing to do is decide what areas we want to include on the map. By area, I mean the specific important places on the map the player can visit. Areas and pathing are the most important parts of a map, as that is how your players travel through your world.
With this map, I am settling on the bare minimum for needed for play. We will include the following:
• The Village Elder’s House
• A Travelling Merchant
• A Small Shack
• A Small Garden
Step 1: Creating the Map Base
The first thing you need to do when creating a new map is to create the map. To do this, right click on your project name in the map list and select New Map.
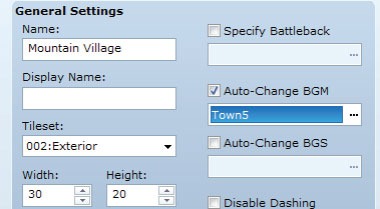
This will bring up the Map Properties screen for you to set a few basic things about the map you are creating. With this map, we will only need to change a few settings as shown below. Name the map, select the Exterior Tileset and make the map 30 tiles by 20. We won’t need much area here. Select a Town theme you like and set it as the BGM. I’m pretty partial to Town5. After you are done, click OK.
Step 2: First Dominant Geographical Feature
The first thing you will notice is that your entire map is covered with a blue checkered pattern. This represents transparency. Since we are making a grassy mountainous area, let’s set that to grass. Select the grass autotile in the A tab (Column 1, Row 3) and use the flood fill tool to cover the map with it.
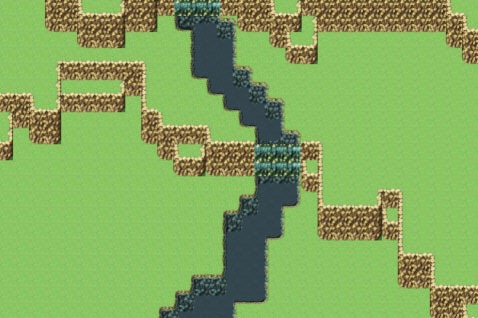
The next thing to consider is what the most dominant geographical feature of your map will be. Being a mountain village, I’ve decided we need a river. Select the deep water autotile in the A tab (Column 2, Row 1) and draw a meandering river using the pen tool. I’m making mine about 3 tiles thick, though 2 or even 1 is a valid choice, just try and balance it to the overall map size. Try to keep your river a consistent width unless it splits or merges with another source of water.
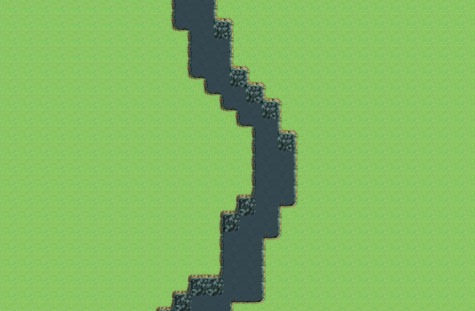
Now we have a river, but it has no depth. It looks very flat. This is because we used the deep water tile to draw it. With a few simple clicks, we can give the water depth using the shallow water autotile (Column 1, Row 1). Any portion of the river border that is horizontal and has grass above, and water below, replace the deep water autotile with the shallow water tile. The sample maps don’t use the water tiles this way, but I prefer it.
Tip: RPG Maker VX Ace comes loaded with a large collection of Sample Maps. To use one, right click on your project name in the Map List and select Load Sample Map. Even if you don’t plan to use them in your game directly, Sample Maps are great for inspiration as well as examining how certain tiles are meant to be used. As an example, you can load the Mountain Village map to learn how to do a lot of the things needed for our current map.
Step 3: Adding the Mountain to the Village
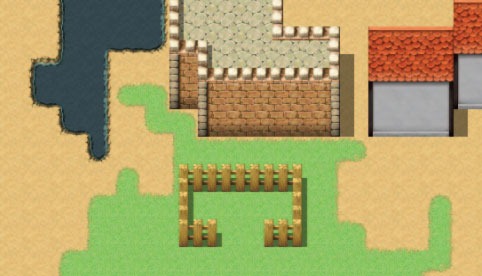
Obviously, something is missing if we want to have a Mountain Village: we need some elevation. To do this, we are going to use the non-autotile cliff tiles near the bottom of the A tab. These tiles are pictured below. There is also a cliff autotile, but it is not as useful for creating multi-tiered maps, as it requires a lot of shift copying to get the same effects that you can get just by using the non-autotile versions. Keep in mind that it is easiest to build a map uphill. The taller sections should be further “north” on your map. It’s possible to map the other direction, but not easy.
I have found the easiest way to make the cliffs is to drag click one of the corners from top to bottom (3 tiles high), and place several down. Then, I connect them together to form a solid wall using the other corner and the flat tiles. Remember to use the inside corner tiles as well.
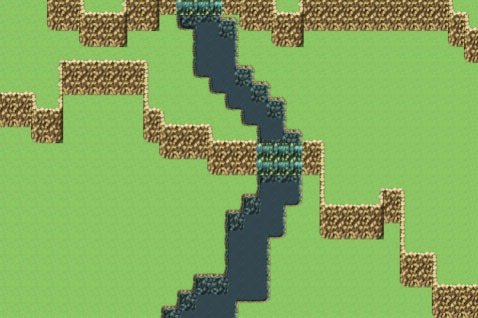
For this map I separated the map into two levels of elevation, plus a back wall to prevent players from walking off the north side. Use the waterfall autotile in the A tab where the cliffs pass the river (Column 2, Row 2).
Step 4: Height Variations
These flat, two tile high cliffs makes the change in height way too abrupt. To break it up, add a few more height variations in by placing shorter cliffs. Putting in a few here and there really breaks up the sheer cliff feel of the map. Make sure to check to make sure you are always using a bottom cliff tile in any place that is touching grass.
Step 5: Placing Your Areas
Now that you are familiar with the Tile Palette, lets start adding more complicated components. Place the areas that your player can travel to on the map. Don’t worry if he can’t currently reach them because of cliffs.
Some of these tiles are in the B and C tab. Remember that these layer on top of A tab tiles. Also, the fence autotile is in the embellishment layer of the A tab.
Step 6: Creating Paths
Our map now has several points of interest for our player to travel between, so let’s put in paths between them to draw them in the right direction. I’m going to use the dirt path autotile from the A tab (Column 2, Row 3) to draw in a path. I think a two tile wide path works best for most of he map, though a couple of areas that I consider lightly travelled with a spotty grown over single tile wide path.
Shift clicking will be incredibly important for this step. If you are putting down a bridge, make sure to hold shift while doing it so that it does not change the water autotiles around it. When making the path, look for nearby tiles in the correct shape for you to shift click copy when needed. I also used shift clicking to have the paths move under the house and shack doors.
In this step, stairs are placed as well. Any change in vertical height needs to have a height changer tile between it, so either ladders or stairs are needed for the player to change height.
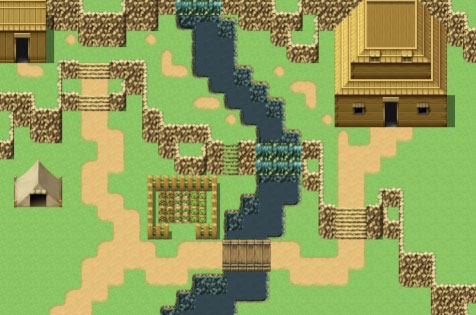
Points of interest and pathing are the most important part of creating any map. Yes, you want to make something that is good looking, but what is truly important is that you do not confuse the player and that he has a clear idea of where he is supposed to go.
Step 7: Filling in Void Areas and Decoration
The important parts of the map are done. The player has places to travel to, and designated paths to go between them. The next step is to fill in the void areas to make the map look less empty.
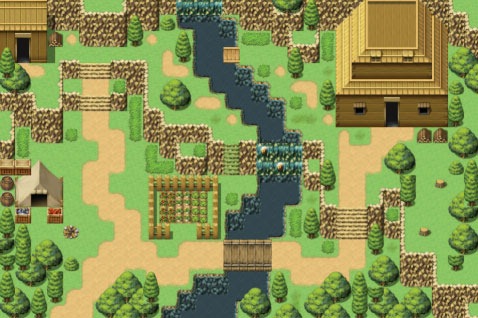
Since we are in a rural area, I decided to go with bunches of trees. There are two different types of green trees in the B tab of the tileset, and overlapping tiles for when they overlap identical types of trees. Now you may be wondering, what if I need to overlap two different types of trees, or just any two B through E tab tiles. For now, just put down the tile that will be on the lower layer, we will add in the upper layer in our next step. In the picture below, you can see an example of lapped trees that have no composite tiles to use to combine them:
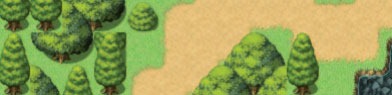
On top of filling in void areas, this is a good time to add decorative tiles to your map. Go wild, but don’t go TOO wild. Try and pick things that make sense. For the tent I put down (which was for the travelling merchant), I decided to place some boxes and barrels for his goods, along with a firepit he has been using at night. You can also use darker green areas and tall grass to spice up the map. I added a fishing dock near the top waterfall just for some flavor:
Step 8: Add Decorative Events
Remember those trees that we lapped that didn’t have an upper layer? We will fix this by using the event layer to add some extra tile graphics. First, select the event layer in the Layer Selection tools. Now, right click on a place you need an extra layer and select New Event.
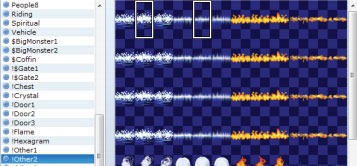
The only thing you will have to do for the tree lapping is change the event graphic. Just scroll down to select Tile B and pick the graphic you need. Waterfalls also use decorative events to dress up the bottom and top of the falls. Shown above, the two different graphics are selected (the one on the left is for the bottoms,
one on the right is for the tops). They are both in Other2.
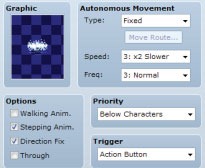
You also need to make a few changes to the event options. Deselect “Walking Anim.” and select both “Stepping Anim.” and “Direction Fix”.
What this does is make it so the event does not turn and cycles through its full animation while standing still.
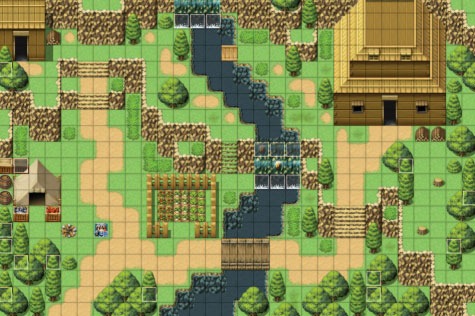
Step 9: Adjust Shadows
The only thing left to do is to adjust the shadows on the map. Switch back to the Map Layer and switch to the Shadow tool. This tool operates in 16×16 pixel areas (1/4 of a tile) and can both create and erase shadows. There are many ways to place shadows, but I just used a simple 1 column next to the right of any vertical height change in this map:

Tutorial Wrap-up
This tutorial should have gotten you familiar with the Map Editor and how it works. We now know the layout of the Map Editor, and how to navigate the Tile Palette to find the tiles we need to draw on the Map Canvas. We have also discussed a lot of theories to help make good maps, such as how to prepare for the “Top Down” RPG perspective and the concept of points of interest
connected by clear paths.
By combining these concepts, you can easily create any map you need. If you want, you can expand the map we have already made, making it larger and including more points of interest.
Next Tutorial Preview: In the next tutorial, we will take a break from creating our game world to begin making our three Heroes. A young fighter from the mountain village, a pious priestess from a secluded monastery, and a mischievous seasoned rogue who wields mystical powers.